A project titled “Development of Machine Learning Algorithms for Electric Autonomous Agricultural Vehicles” has been awarded. This project is sponsored by WApplE Cloud Co., Ltd. It will start on January 1, 2024, and end on June 30, 2024.


A project titled “Development of Machine Learning Algorithms for Electric Autonomous Agricultural Vehicles” has been awarded. This project is sponsored by WApplE Cloud Co., Ltd. It will start on January 1, 2024, and end on June 30, 2024.
The proposal, “RID: Open-Source Autonomous Ground Vehicular Robotics Platform,” has been awarded for Research Initiation & Development (RID – FY24 Fall Cycle). 1/15/2024 – 1/14/2025.
I am looking for a graduate student who will work on this project during this summer. Please contact me if you are interested in joining this project.
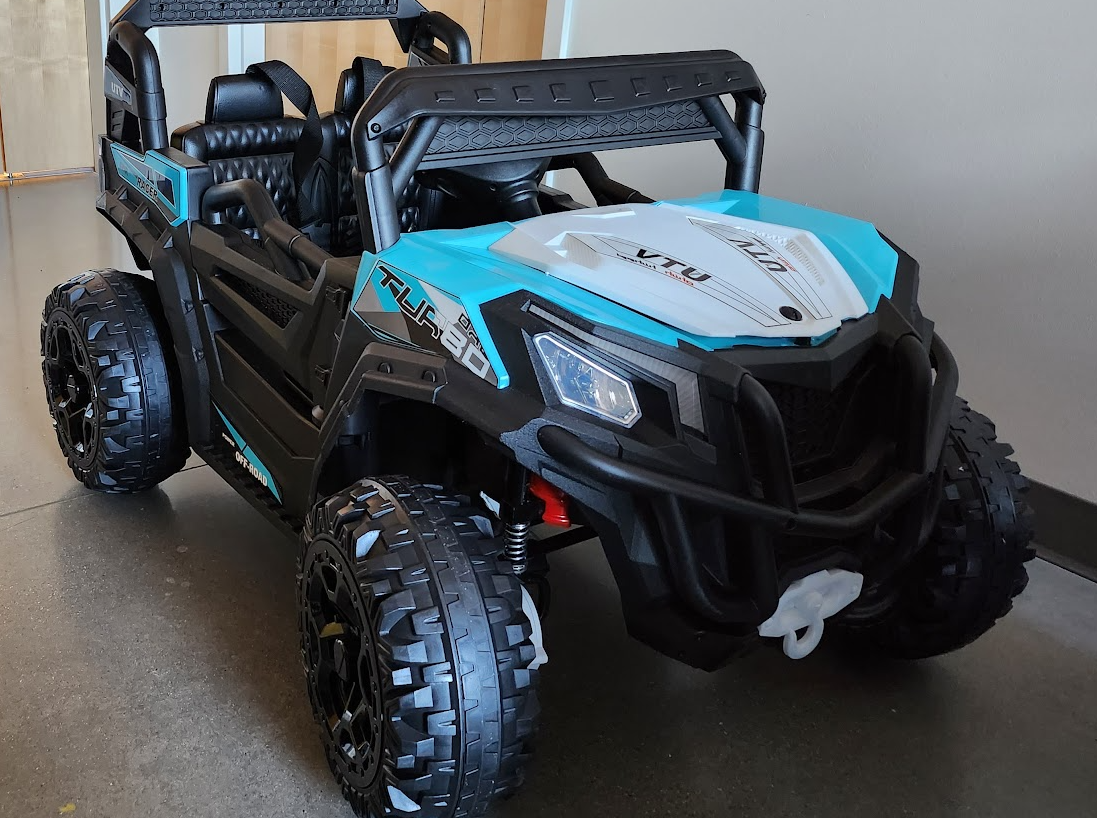
The new industry of highly automated mobile robots, including autonomous vehicles, is in high demand for skilled engineers. Engineers for the industry require interdisciplinary knowledge and skillsets, including basic programming skills, electric circuitry, robotic kinematics, machine learning, and Artificial Intelligence (AI). Academia has been trying to respond to the high demand, and there have been efforts to integrate the interdisciplinary knowledge of highly automated intelligent systems, including autonomous vehicles, into their curricula. The integration of the new skillsets or restructuring of the existing curricula is, however, a very challenging task. Some efforts have been made by introducing a small-scale (1/24th, 1/16th, or 1/10th) vehicle to teach the relevant knowledge and skillsets and train researchers and engineers. The MIT RACECAR, F1TENTH, MuSHR, Go-CHART, Dockiebots of Duckietown, and Donkey Car are part of the efforts. A major limitation of the current approaches is in the following two dimensions: (i) The lack of reproducibility owing to heavy craftsmanship requirements due to extensive modifications of the vehicular platform that include removal and replacement of motors, installation of a new ESC (Electronic Speed Controller), custom Printed Circuit Boards, etc. (ii) The restricted onboard processing capabilities due to the platform size (1/24th scale two-wheel or four-wheel differential driving and 1/10th scale Remote Controlled (RC) car). To overcome these major limitations, this project brings forward an innovative idea of building a 1/4th scaled vehicle without extensive modification and providing full-stack software for AI-based perception, planning, and control.
Last update: 11/11/2023 – TensorFlow 2.14
NVIDIA Driver: a.k.n. Graphics card driver. 535 is the latest version as I am writing this article.
sudo apt install nvidia-driver-535Then, reboot your system. Check the driver is properly installed with the following command.
nvidia-smiAssuming an Anaconda environment you use is jaerock. Python 3.10 is chosen to be safe since TensorFlow 2.14 requires 3.9 - 3.11. Also, note that cuDNN 8.6 is recommended according to TensorFlow 2.14 software requirements. No conda package of cuDNN 8.6 was found in the Anaconda default channel. So, 8.9 is used instead.
conda create --name jaerock python=3.10
conda activate jaerock
conda install cudatoolkit=11.8 cudnn=8.9

mkdir -p $CONDA_PREFIX/etc/conda/activate.d
echo 'export OLD_LD_LIBRARY_PATH=${LD_LIBRARY_PATH}' > $CONDA_PREFIX/etc/conda/activate.d/env_vars.sh
echo 'export LD_LIBRARY_PATH=$LD_LIBRARY_PATH:$CONDA_PREFIX/lib/' >> $CONDA_PREFIX/etc/conda/activate.d/env_vars.sh

mkdir -p $CONDA_PREFIX/etc/conda/deactivate.d
echo 'export LD_LIBRARY_PATH=${OLD_LD_LIBRARY_PATH}' >  $CONDA_PREFIX/etc/conda/deactivate.d/env_vars.sh
echo 'unset OLD_LD_LIBRARY_PATH' >> $CONDA_PREFIX/etc/conda/deactivate.d/env_vars.sh
Deactivate the conda environment or just close the current working terminal and re-open it.
conda activate jaerock
pip install tensorflow[and-cuda]
After installing, you can test if the TensorFlow runs with GPUs.
python3 -c "import os; os.environ['TF_CPP_MIN_LOG_LEVEL'] = '3'; import tensorflow as tf; print('Num GPUs Available: ', len(tf.config.list_physical_devices('GPU')))"You will see Num GPUs Available: #
If # is other than 0, you are all set.
 2
2The version of the default Gazebo9 with ROS Melodic on Ubuntu 18.04 is 9.0.0. This version has an issue connecting to the API server for Gazebo models. The error messages below indicate that Gazebo cannot connect to the server.
[Err] [REST.cc:205] Error in REST request

libcurl: (51) SSL: no alternative certificate subject name matches target host name 'api.ignitionfuel.org'
NOTE: People say that the server name inside ~/.ignioin/fuel/config.yaml must be changed. But this is not true. You don’t need to change this file. Just keep the original.
Upgrade your Gazebo 9.0.0 to the latest Gazebo 9. As of today when I write this article, 9.19.0 is the latest version of Gazebo 9.
sudo apt update
sudo apt install gazebo9
Check your Gazebo version.
gazebo --verboseGazebo multi-robot simulator, version 9.19.0
Copyright (C) 2012 Open Source Robotics Foundation.
Released under the Apache 2 License.
http://gazebosim.org
Gazebo multi-robot simulator, version 9.19.0
Copyright (C) 2012 Open Source Robotics Foundation.
Released under the Apache 2 License.
http://gazebosim.org
[Msg] Waiting for master.
[Msg] Waiting for master.
[Msg] Connected to gazebo master @ http://127.0.0.1:11345
[Msg] Connected to gazebo master @ http://127.0.0.1:11345
[Msg] Publicized address: 10.0.2.15
[Msg] Publicized address: 10.0.2.15
[Msg] Loading world file [/usr/share/gazebo-9/worlds/empty.world]If you still see 9.0.0, please follow the steps below.
sudo sh -c 'echo "deb http://packages.osrfoundation.org/gazebo/ubuntu-stable `lsb_release -cs` main" > /etc/apt/sources.list.d/gazebo-stable.list'wget https://packages.osrfoundation.org/gazebo.key -O - | sudo apt-key add -sudo apt update
sudo apt install gazebo9
sudo apt install libgazebo9-devAfter upgrading Gazebo 9.0.0 to 9.19.0, when you start gazebo, you may see error messages. Then you have to upgrade libignition-math2.
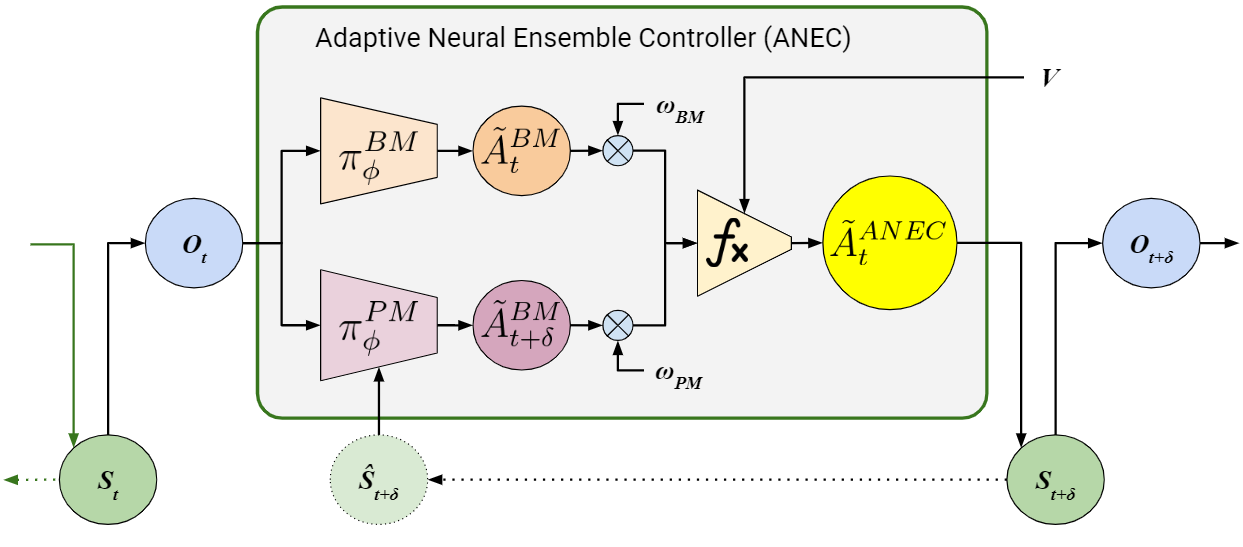
libignition-math2sudo apt upgrade libignition-math2Our work on the adaptive neural ensemble controller has been accepted for the 2023 IEEE/RSJ International Conference on Intelligent Robots and Systems (IROS 2023), which will be held October 1 – 5, 2023, at Huntington Place in Detroit, Michigan, USA. The paper title is “ANEC: Adaptive Neural Ensemble Controller for Mitigating Latency Problems in Vision-based Autonomous Driving.”
When you use sudo, you will see the error messages as below.
user-name is not in the sudoers file. This incident will be reported.
The default user does not have the sudo group. Let’s assume that the user name is jaerock. We need to make jaerock have sudo group. To make this change, use usermod command. Only super user can use this command. Thus, switch to super user using su, then you will be asked to enter a password. Use your user password. Then use usermod command to add sudo group to your user account. After this, simply use exit. Then you will be back to your account.
su
usermod -a -G sudo jaerock
exit
DO NOT INSTALL cuda through $ sudo apt install cuda since this will install the latest NVIDIA driver as well without asking. The newest NVIDIA driver might not work with a particular kernel version. Through my ordeals, I figured out that only some particular combinations work.
The safest way to install CUDA is to use a conda environment. First, install cuda and cudnn inside your conda environment. All the conda related libraries are located in ~/anaconda3/envs/<env-name>/lib. To let your environment know the location of the CUDA libraries LD_LIBRARY_PATH needs to be used.
Activate the environment first. Assuming the environment name is env-name, the command is like this.
conda activate env-nameThen run the following commands.
mkdir -p $CONDA_PREFIX/etc/conda/activate.d
echo 'export OLD_LD_LIBRARY_PATH=${LD_LIBRARY_PATH}' > $CONDA_PREFIX/etc/conda/activate.d/env_vars.sh
echo 'export LD_LIBRARY_PATH=$LD_LIBRARY_PATH:$CONDA_PREFIX/lib/' >> $CONDA_PREFIX/etc/conda/activate.d/env_vars.sh

mkdir -p $CONDA_PREFIX/etc/conda/deactivate.d
echo 'export LD_LIBRARY_PATH=${OLD_LD_LIBRARY_PATH}' >  $CONDA_PREFIX/etc/conda/deactivate.d/env_vars.sh
echo 'unset OLD_LD_LIBRARY_PATH' >> $CONDA_PREFIX/etc/conda/deactivate.d/env_vars.sh
Deactivate your environment and activate it again. Check if your TensorFlow properly works with GPUs.
python3 -c "import os; os.environ['TF_CPP_MIN_LOG_LEVEL'] = '3'; import tensorflow as tf; print('Num GPUs Available: ', len(tf.config.list_physical_devices('GPU')))"You will sse Num GPUs Available: #
If # is other than 0, you are all set.
 82
82 1
1Last few days, I spent hours and hours making NVIDIA GPU (GeForce RTX 3070 Ti 8GB) work on my Alienware x15 R2.
I would like to share the lessons that I learned from the ordeal.
The most important point is that “NEVER EVER INSTALL cuda meta package via apt install.” If you do, it will replace your current NVIDIA driver with the latest release which does not work with your current kernel.
Here are combinations that worked and did not work for your reference.
$ sudo apt install backport-iwlwifi-dkmsThis fresh install works with GPU. But, WIFI, speaker, and microphone do not work. After Linux firmware installation from one of the recent versions at http://mirrors.edge.kernel.org/ubuntu/pool/main/l/linux-firmware/, WIFI and speaker work.
When I update the software, which includes kernel upgrade, the kernel version is as follows.
This kernel does not work with NVIDIA driver 471.
When I install the latest kernel, 6.0.9 as of 11/22/2022, WIFI and speaker work but no luck on GPU.
Here is what I did to make WIFI, speaker, mic, and even suspend work.
$ sudo apt install backport-iwlwifi-dkms